Summary
- Apple’s macOS operating system has been around for decades, and it has inherited a broad collection of settings over the years.
- Some of the settings and customization options within macOS are well known, while others are hidden beneath the surface.
- Here are five underappreciated macOS settings that I always adjust when using a MacBook or an iMac.
The history of macOS extends back decades, and Apple has been iterating on the operating system year-over-year since its very inception. As such, the popular desktop OS has been endowed with a growing collection of features, customization options, and other useful system tools throughout time.
Some of the settings found within macOS are relatively well-known, including the option to enable tabs in Finder, to adjust the size and positioning of the Dock, and to tweak the aesthetics of the user interface. Hidden below the surface, however, are a set of more obscure (and yet incredibly useful) settings that every Mac owner should know about.
Here are five underappreciated and underacknowledged settings within macOS that I always make use of when powering up a MacBook or any other Apple-made computer.
Related
5 overlooked Google Pixel settings I wish I knew about sooner
Despite presenting the Android OS in a clean and minimalistic manner, Google’s Pixel phones also feature some handy lesser-known settings.
5
Tiled windows have margins
Make the most of your monitor’s screen real estate
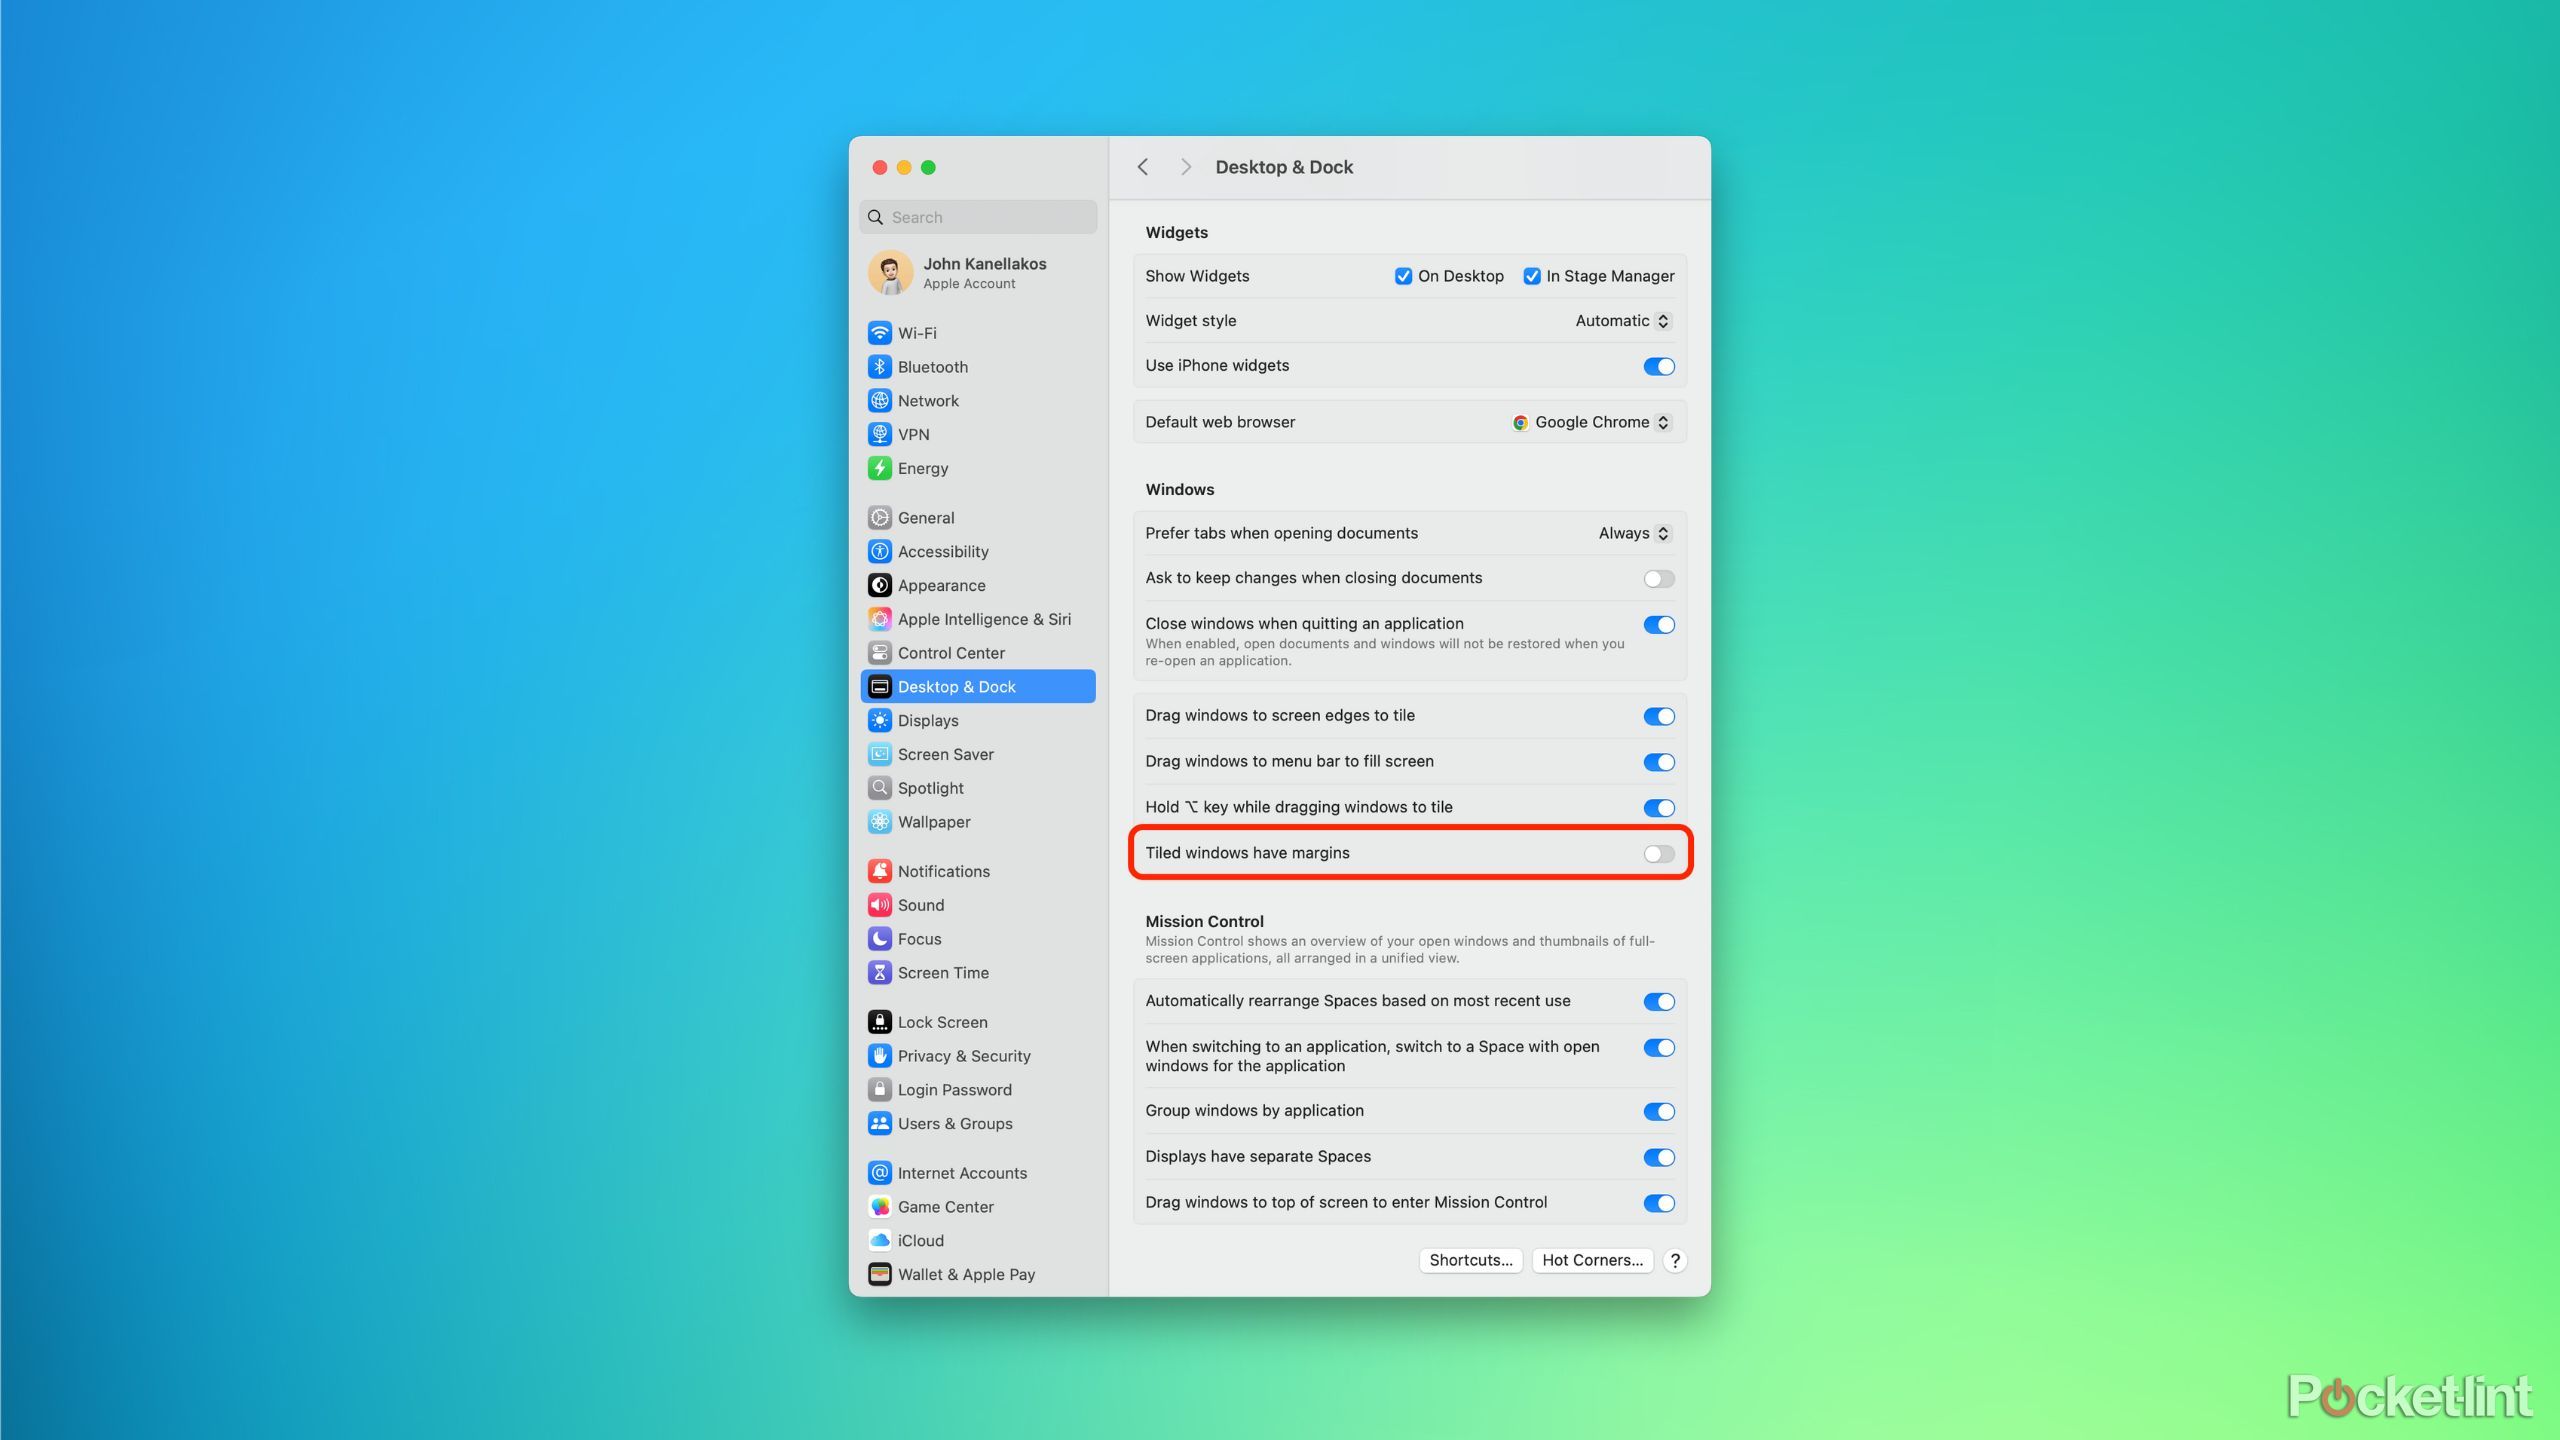
On a fresh installation of macOS, the ‘Tiled windows have margins’ toggle is switched on by default. This setting adds a small amount of padding around open application windows that have been placed side-by-side, in order to give each interface room to breath. If you’re running the OS on a large external display, then this option is nice to have, but it makes a lot less sense on a cramped laptop screen.
By unchecking this window margins setting, snapped windows will display right next to one another, without any of the padding. This allows you to take full advantage of the limited screen real estate of a MacBook, with more content displayed on screen and less of your wallpaper showing through.
To remove the padding around tiled windows, follow these steps:
- Navigate to System Settings > Desktop & Dock.
- From here, simply toggle off Tiles windows have margins.
Related
6 overlooked Samsung Galaxy settings that can upgrade your user experience
It’s worthwhile to try these six settings on your Samsung Galaxy device.
You’ll never have to open the Passwords app again
With the release of macOS 15 Sequoia, Apple introduced a standalone Passwords app. Rather than having to dig through System Settings to locate and update saved account credentials synced with iCloud, this new app streamlines the process greatly.
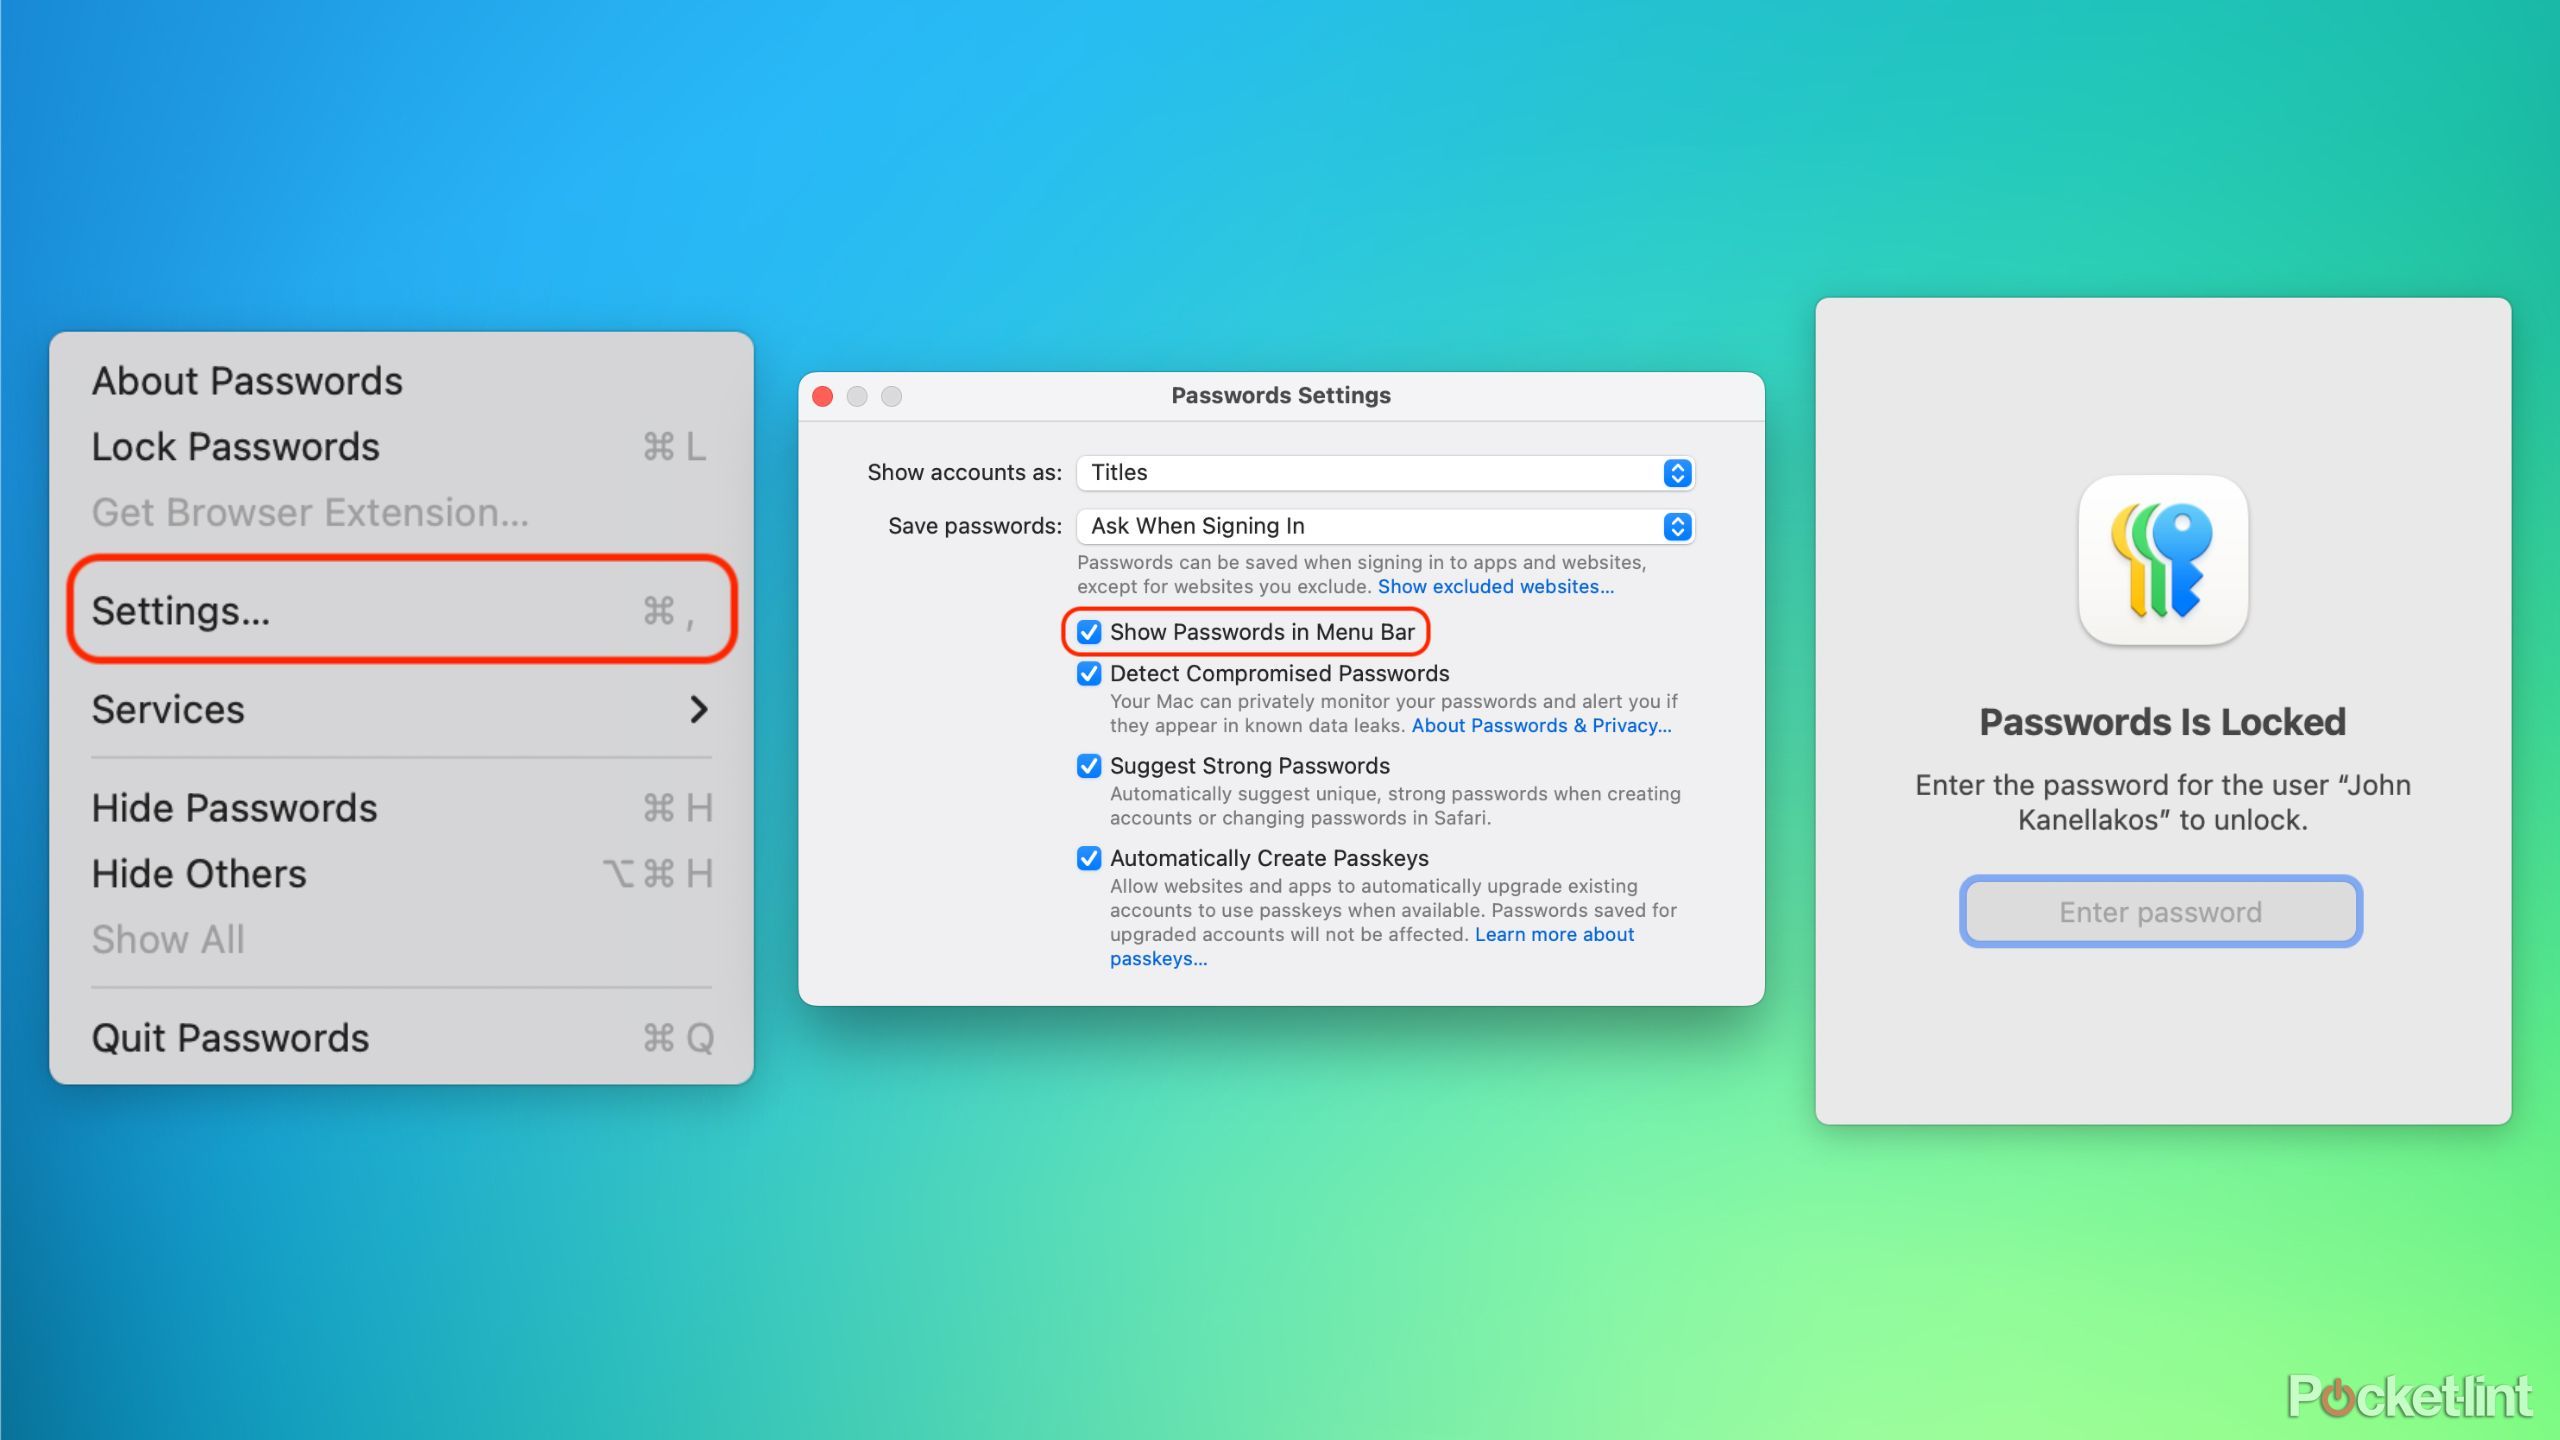
Lesser-known, however, is the hidden Passwords Menu Bar option that can be enabled from within the app itself. When toggled on, this adds a quick-access shortcut to all your saved account usernames and passwords right from the system’s main Menu Bar, while still maintaining a level of protection via passcode or biometric unlock.
To add the Passwords shortcut to your Menu Bar, follow these steps:
- Launch the Passwords app.
- From the Menu Bar, click on Passwords > Settings…
- Here, you’ll be prompted to enter your password or to authenticate biometrically.
- Once in, check the Show Passwords in Menu Bar option from within the Passwords Settings window.
Related
I changed these 5 iPhone settings and it instantly made dialogue clearer
Whether you want clearer audio when listening to podcasts or bingeing Netflix, these settings make for better dialogue.
3
Three finger trackpad drag
Drag around windows and highlight text without lifting a finger
Within the PC space, Apple is known for its excellent implementation of trackpad gestures. Owing to its top-down approach across both software and hardware, the company has been able to craft a set of gestures that feel silky smooth, responsive, and natural.
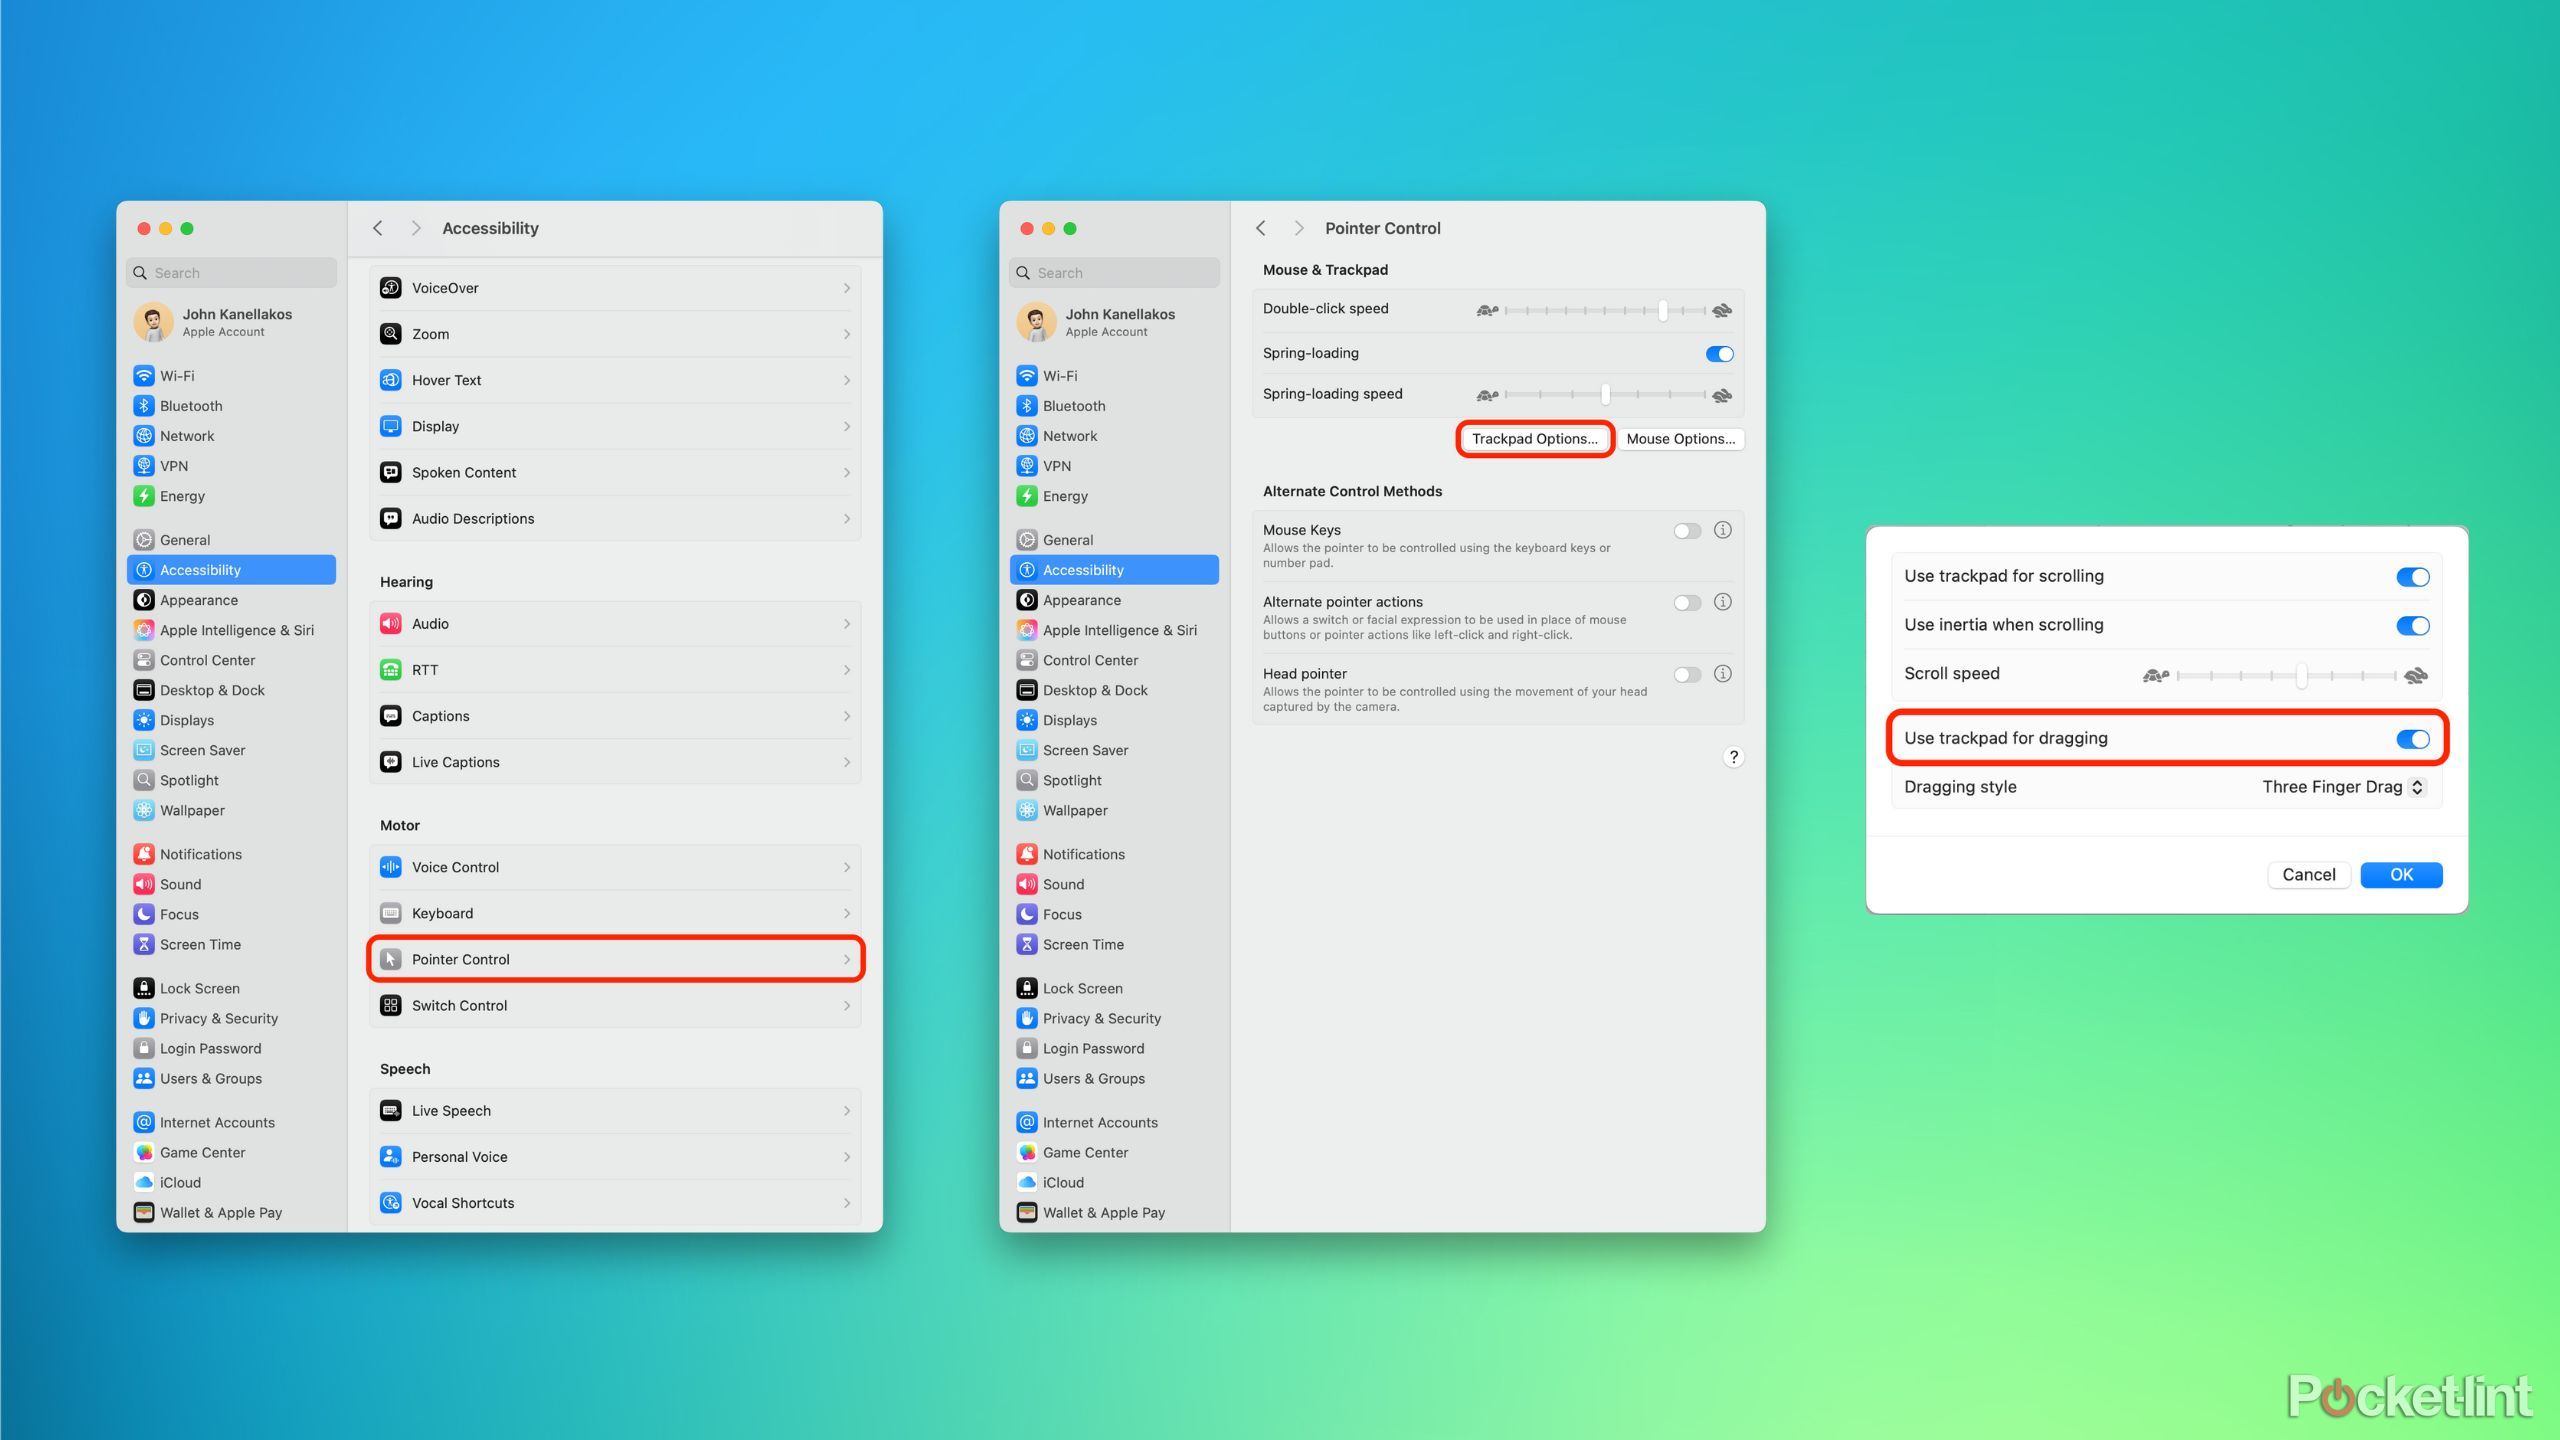
While most commonly used gestures are enabled by default on a fresh installation of macOS, one in particular is disabled: Use trackpad for dragging. This option unlocks the ability to drag around open application windows and to highlight text via a triple-finger swiping gesture, as opposed to relying on a press-and-drag motion. Aside from being a useful accessibility feature, it feels surprisingly fluid to perform this gesture in real time — once I got used to it, I never looked back.
To enable three finger dragging on your Mac trackpad, follow these steps:
- Launch System Settings.
- Navigate to Accessibility > Motor and click on Pointer Control.
- From here, click on the Trackpad Options… button.
- Toggle on Use trackpad for dragging, and select Three Finger Drag from the Dragging style dropdown menu.
Related
I automatically adjust these 5 AirPods Max settings to make the most out of my listening
From toggling on ANC to automatic head detection, these settings are simple yet powerful.
2
Hot Corners + Shift
Hot Corners are great, but this hidden tweak makes them even better
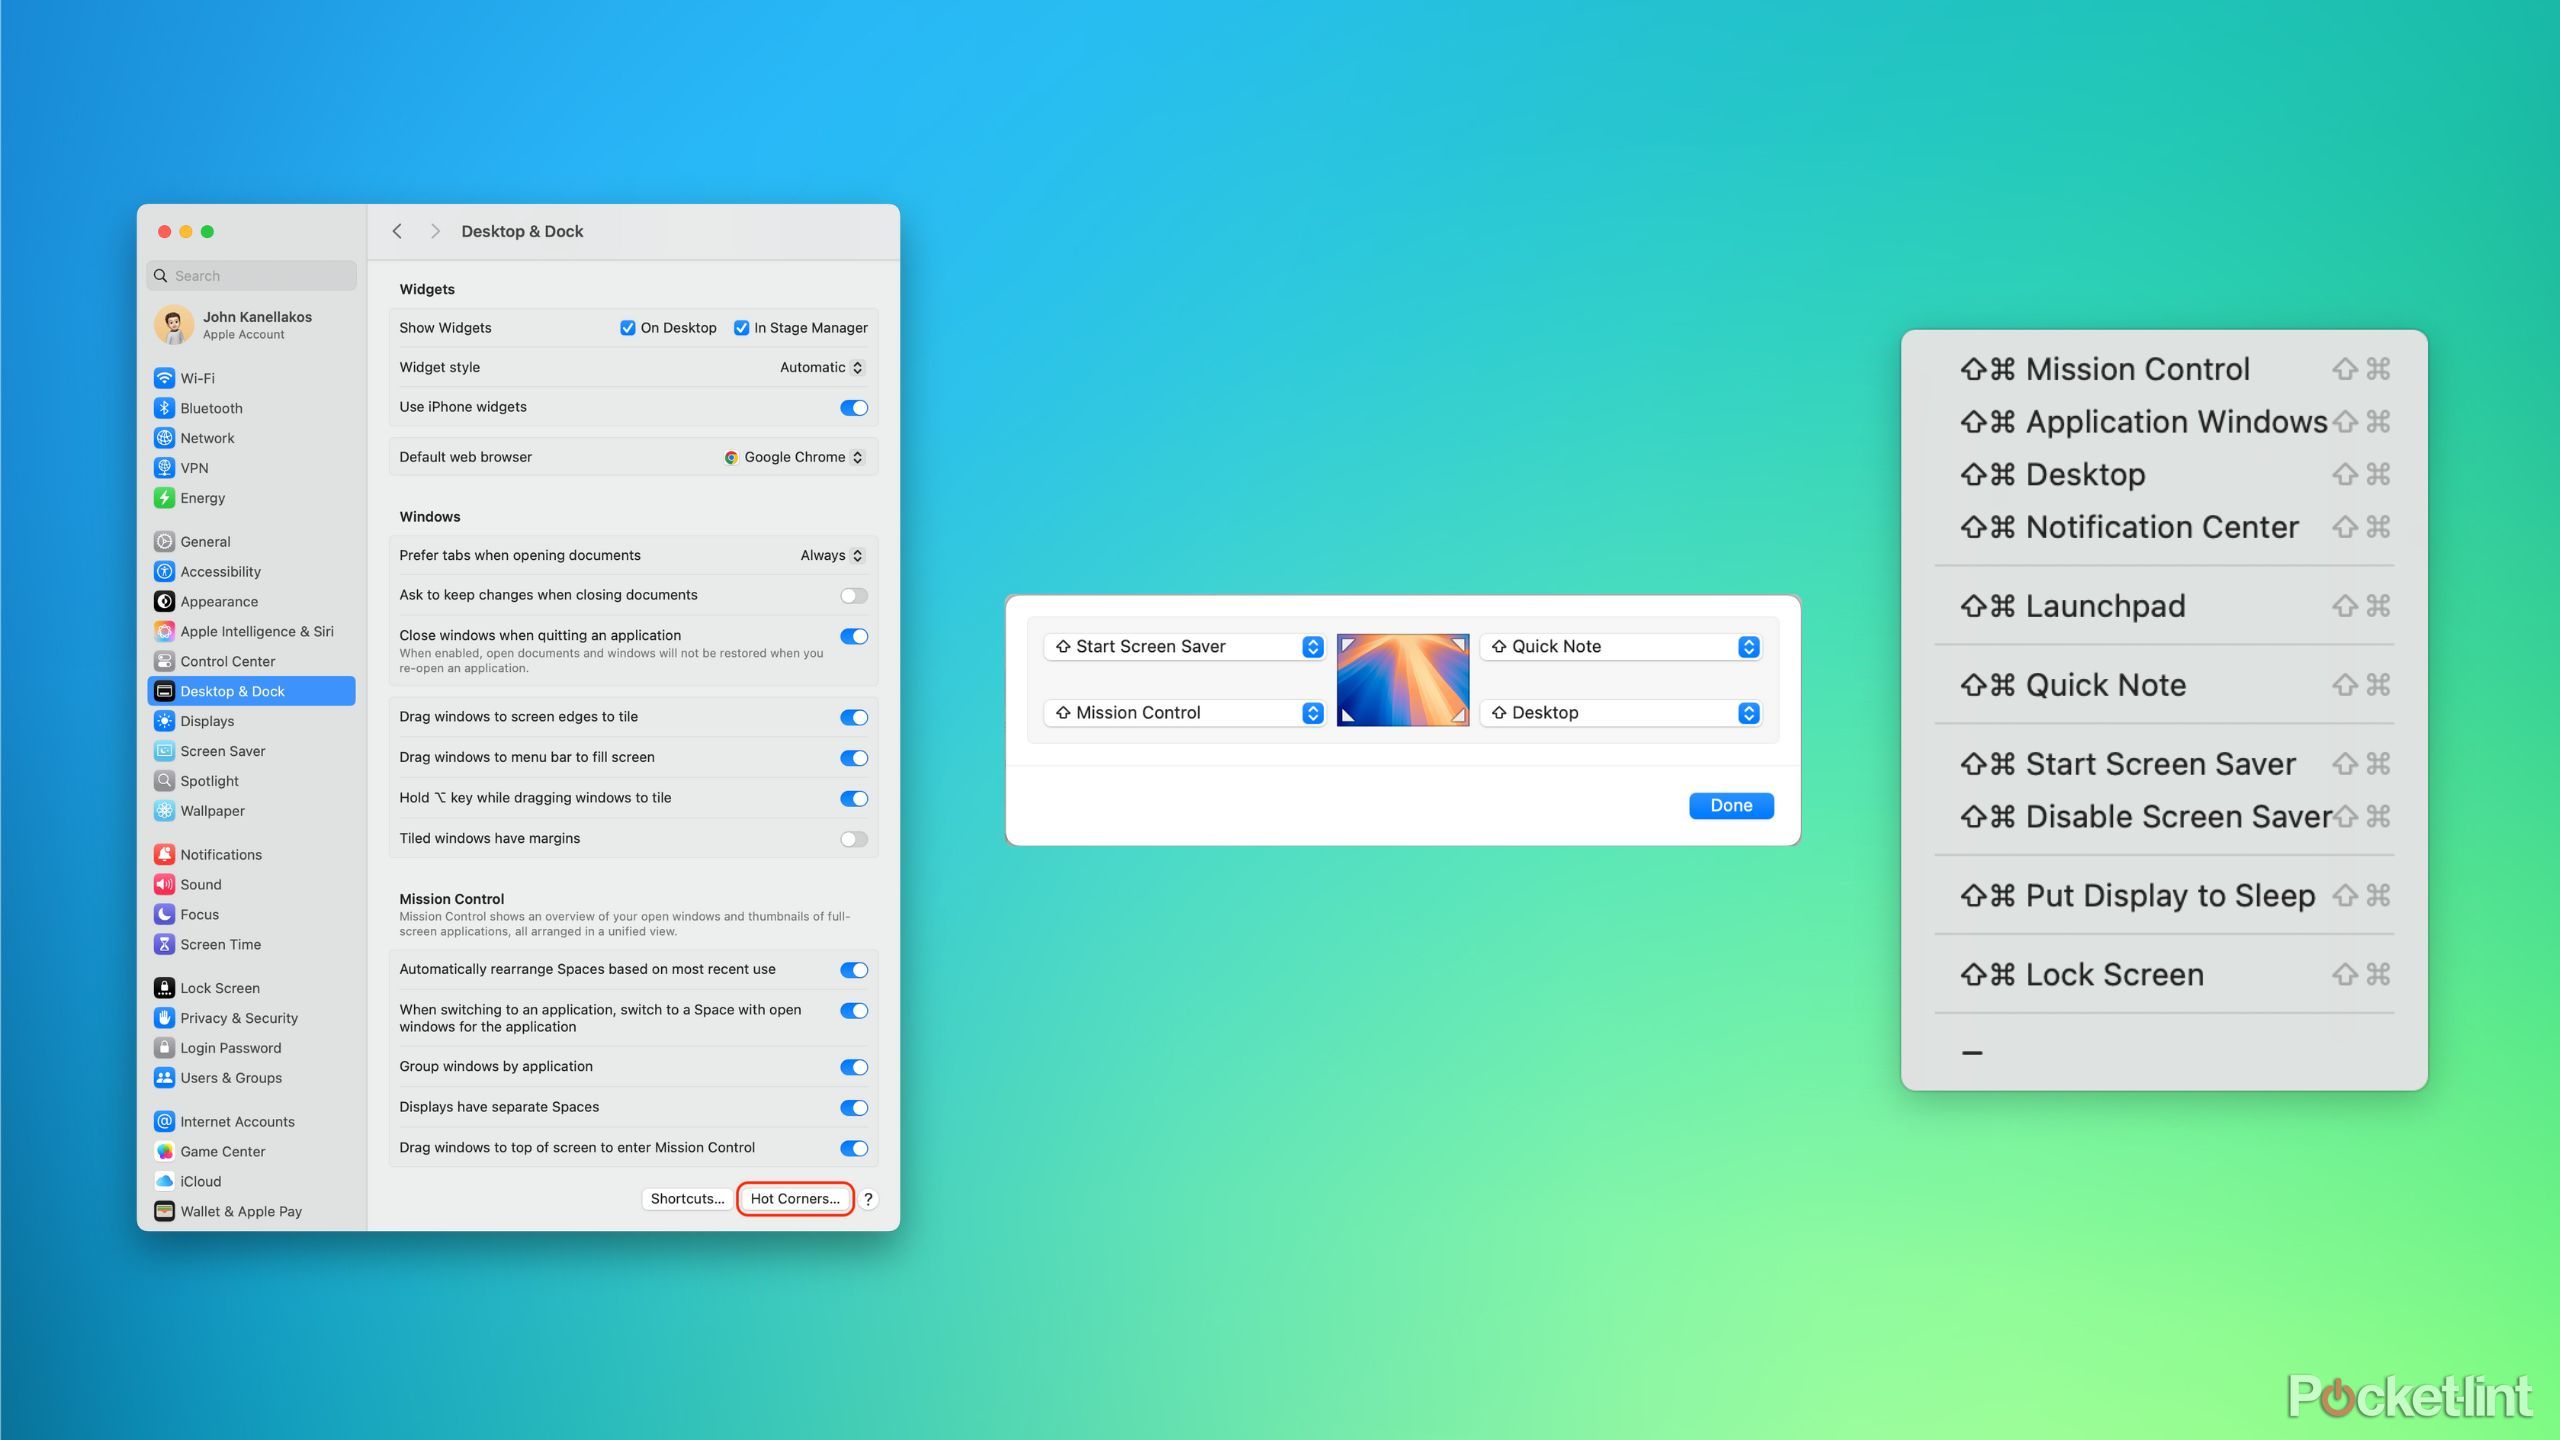
Many macOS users are already familiar with the Hot Corners feature, which lets you set up actions to take place when hovering your mouse cursor towards designated corners of the screen. Lesser-known, however, is the ability to supplement Hot Corners with a modifier key.
In my personal experience, I often find myself accidentally triggering Hot Corners when I don’t mean to, which is where this hidden tweak comes into play. It allows you to press down on one of the following keys when selecting a quick action: shift, ctrl, opt, and cmd. This way, accidentally triggering Hot Corners is avoided, without having to resort to disabling the feature in its entirety.
To configure Hot Corners with modifier keys, follow these steps:
- Launch the System Settings app.
- Navigate to Desktop & Dock and click on the Hot Corners… button located in the bottom right-hand corner of the window.
- A separate window will pop up, with four dropdown menus corresponding to each corner of your display.
- When selecting an action from each dropdown menu, do so while holding down a modifier key.
- When you’re satisfied, click on the Done button in the lower right-hand corner.

Related
5 Windows 11 settings I immediately change on any new PC
I always adjust these settings on any new Windows 11 PC to enhance my experience.
1
Spaced out Dock icons
A simple terminal command for digital organization lovers
The Dock is a macOS staple, and its purpose is multifunctional. It allows you to pin frequently used apps and folders to it, to minimize active windows into miniature thumbnails, to access the system’s Finder and Launchpad, and to drag unwanted files directly to Trash.
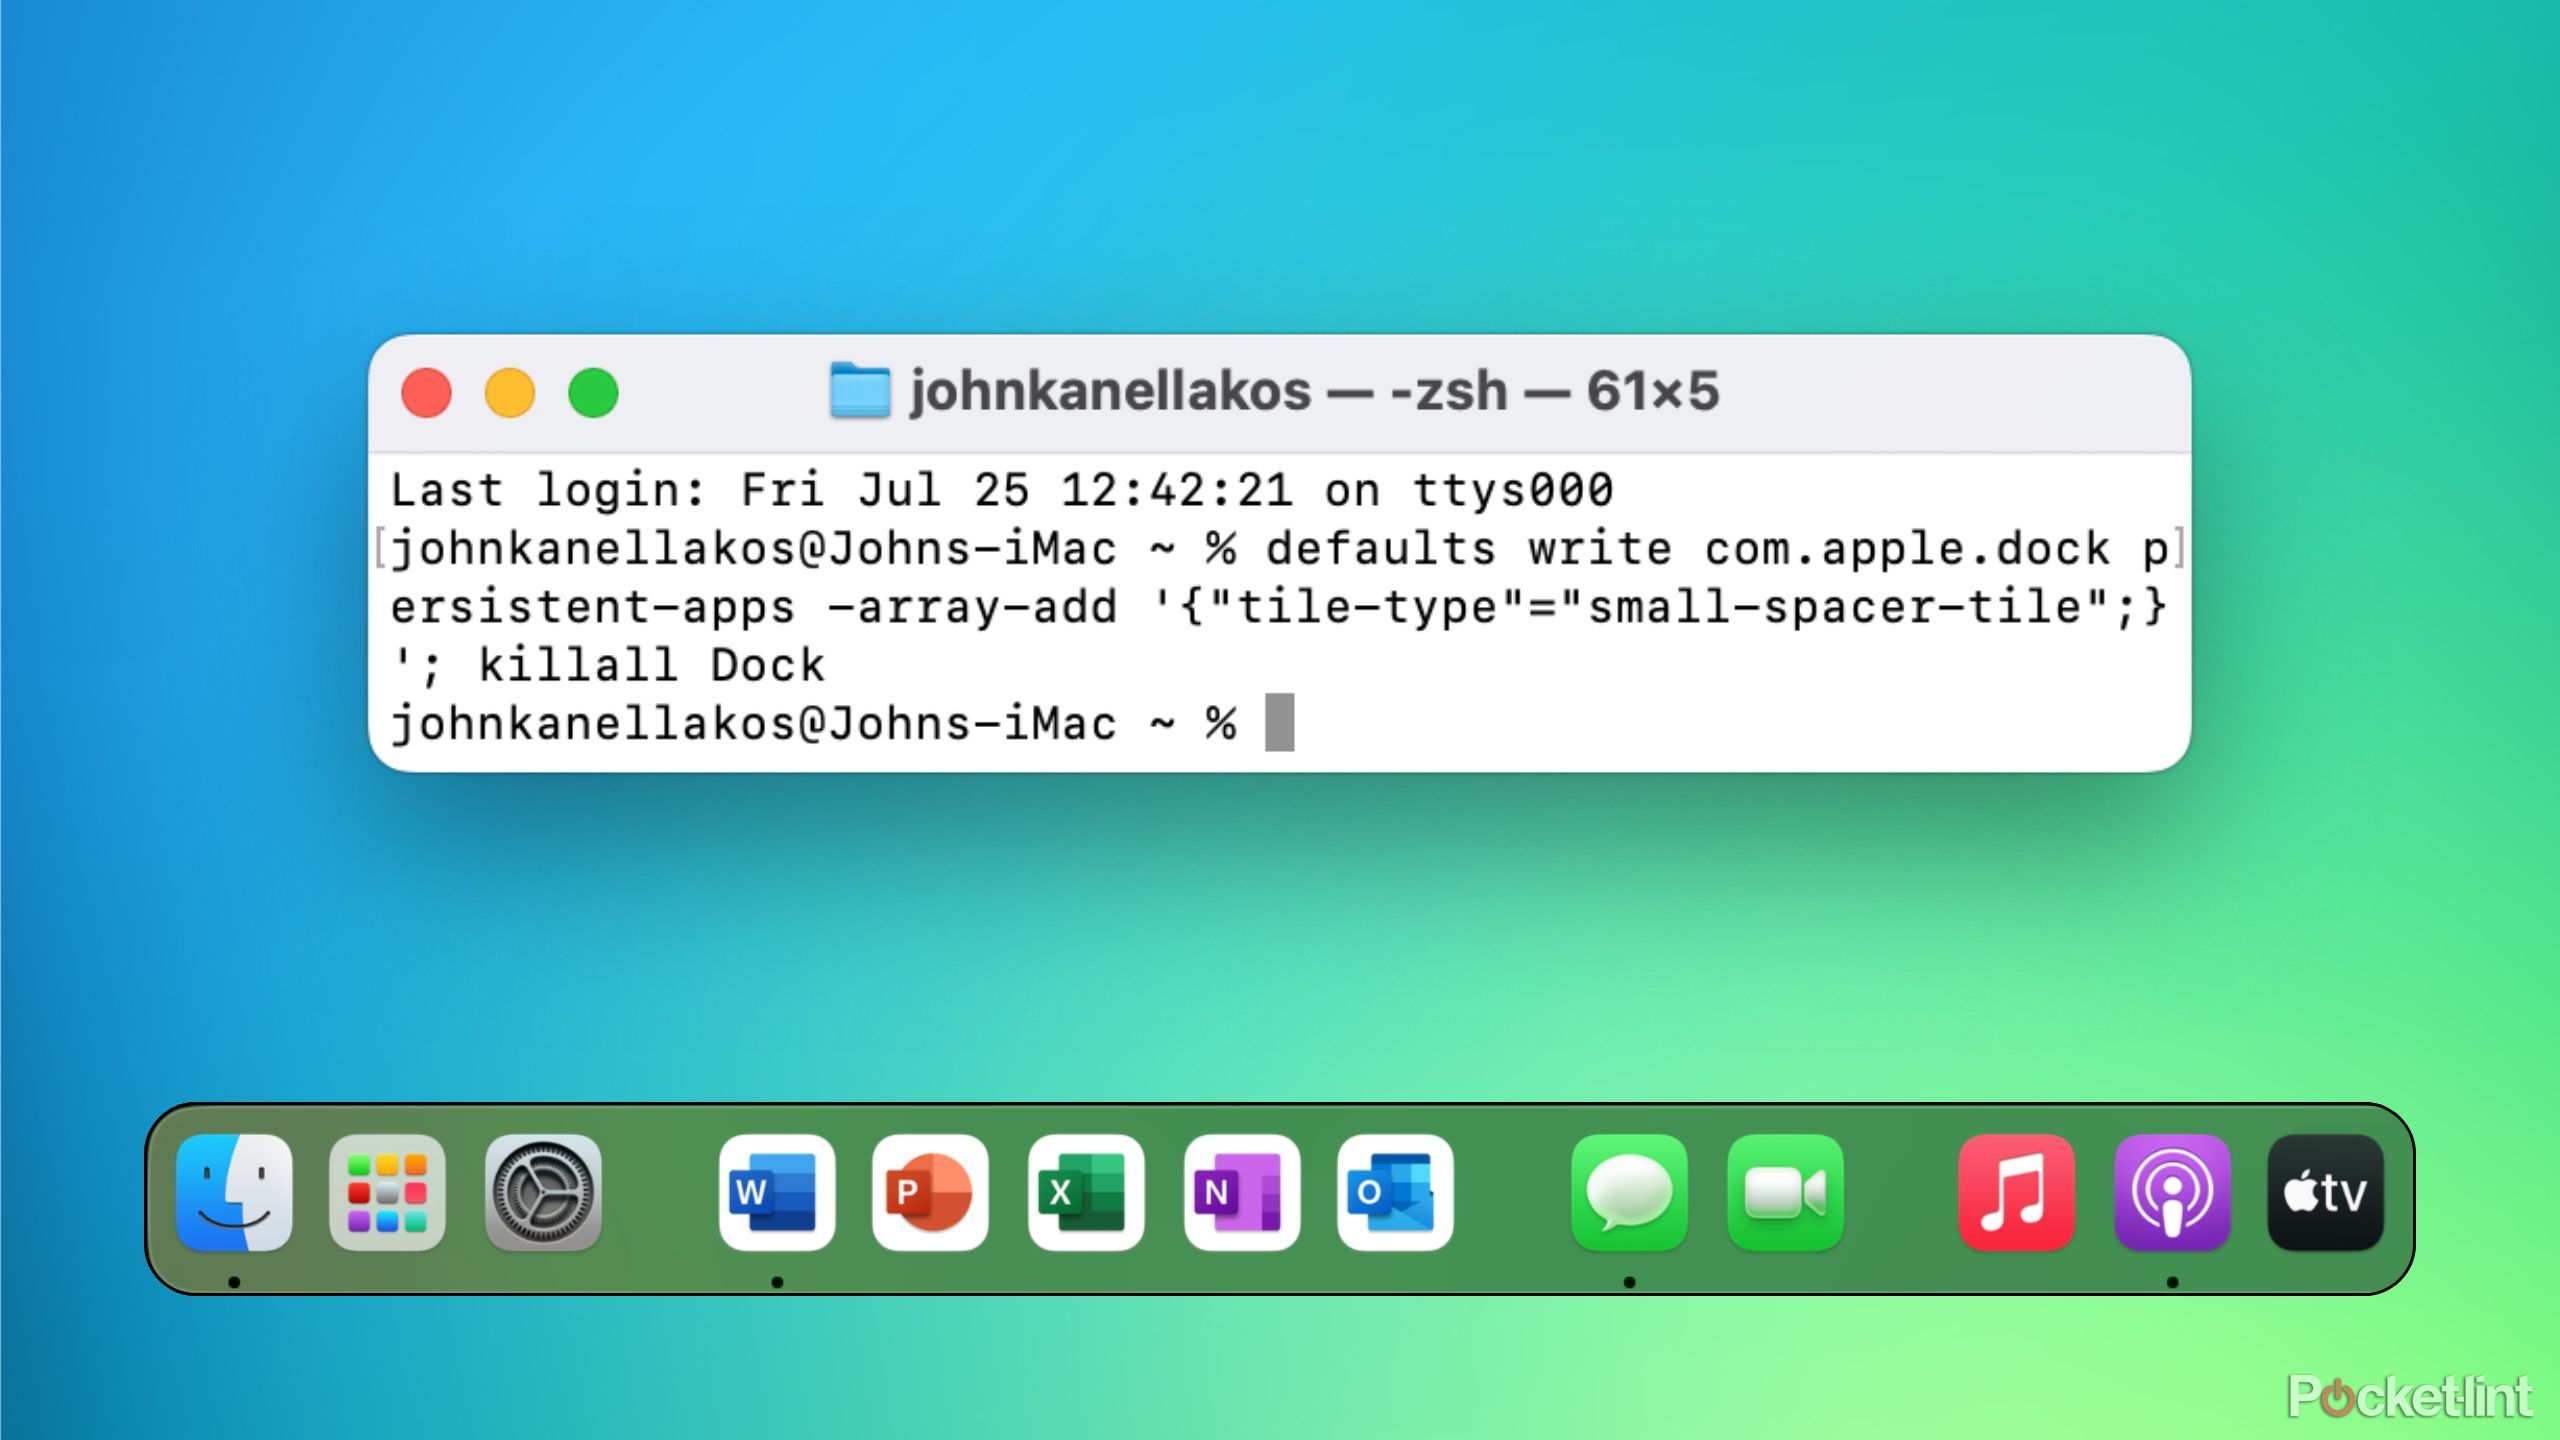
While Apple provides several out-of-box customization tools to adjust the Dock to your liking (including the ability to resize and reposition it), there’s actually a hidden customization tool that I always make use of. By performing a simple Terminal command, you can add ‘hidden’ icons to the Dock, which can then be repositioned or stacked next to each other to create a sense of visual hierarchy.
To add empty icon slots within the Dock, follow these steps:
- Launch the Terminal app from within the Launchpad or from Finder > Applications > Utilities.
- Copy and paste this command into the Terminal window, and then press Enter: defaults write com.apple.dock persistent-apps -array-add ‘{“tile-type”=”small-spacer-tile”;}’; killall Dock
- Every time you enter this command, a new blank icon will appear within your Dock. From here, you can move it around just like any other app icon.
- To remove an unwanted blank icon, simply drag it out of the Dock, and it will immediately disappear.
Related
7 ways I set up Windows 11 for a better experience
You can easily enhance your Windows 11 experience by tweaking these settings.
Trending Products

2 Pack – 22 Inch Monitor FHD ...

Antec NX410 ATX Mid-Tower Case, Tem...

Samsung 27′ T35F Series FHD 1...

Acer Aspire 5 15 Slim Laptop | 15.6...

Wireless Keyboard and Mouse Combo, ...

SAMSUNG 27″ Odyssey G32A FHD ...

15.6” Laptop computer 12GB DD...

Cooler Master Q300L V2 Micro-ATX To...

Lenovo Ideapad Laptop Touchscreen 1...


